PFM crowns are a trusted choice for a reason—they offer incredible strength and natural-looking aesthetics. But as your lab partner, we know the final restoration is only as good as the initial prep. A successful outcome hinges on a meticulous pfm crown prep. This process requires careful tooth reduction to make space for both the metal substructure and the porcelain overlay. Getting this step right is crucial for a perfect fit, especially when planned with other crown and bridge services, ensuring consistency and strength for your patient.
Porcelain-fused-to-metal (PFM) crowns are among the most well-liked and dependable restorations. This material closely resembles the look of a natural tooth by using a cast metal framework covered with porcelain. When combined with modern zirconia and PFM crown solutions, clinicians can address a wide range of restorative needs while balancing strength and appearance.
For this dental restoration to be effective, the tooth must be sufficiently prepared, which sometimes necessitates significant dental reduction. To conceal the metal base and the porcelain used to mask the alloy, the crown must be thick enough. A methodical and planned approach to tooth preparation helps ensure that the prep is properly formed and supports long-term success.
What Instruments Do You Need for a PFM Crown Prep?
The materials needed for a PFM crown preparation are:
- Metal matrix band
- Coarse-grit flat-end tapered diamond bur
- Fine-grit flat-end tapered diamond bur
- Scalpel blade and handle
- High-speed handpiece
- End-cutting diamond bur
- Coarse-grit football-shaped diamond bur
- A small diameter round-end diamond bur
- Silicone putty impression material
- End-cutting diamond bur
- Wooden wedges
Risks and Consequences of Improper Preparation
A successful PFM crown depends entirely on the quality of the tooth preparation. It’s a delicate balance; removing too much or too little tooth structure can lead to a cascade of problems, from a poor fit to eventual restoration failure. Precision is key, as even minor inconsistencies in the prep can compromise the final outcome. The goal is to create a stable foundation that supports the crown for years to come, ensuring both function and aesthetics are met without jeopardizing the health of the underlying tooth or surrounding tissues. This careful approach is fundamental for any restorative procedure, as the lab can only build upon the foundation you provide.
Under-Preparation vs. Over-Preparation
Think of tooth reduction as a balancing act. If you don’t remove enough tooth structure (under-preparation), the lab has insufficient space to work with. This can result in a crown that is too bulky, looks unnatural, and fits poorly. These ill-fitting crowns often create ledges that trap plaque, leading to gingival inflammation or decay. The porcelain layer might also be too thin, making it prone to fracture under normal biting forces. On the other hand, being too aggressive and removing too much tooth structure (over-preparation) creates its own set of serious problems. This can weaken the remaining tooth, making it susceptible to fracture, and may even damage the pulp, leading to sensitivity or the need for root canal therapy. Over-preparation also reduces the surface area needed for a secure bond, compromising the crown’s retention and potentially causing gum issues.
Sharp Internal Angles and Inconsistent Reduction
Beyond the amount of reduction, the shape and texture of the preparation are just as important. All internal corners should be rounded, and the finished tooth surface must be smooth and free of tool marks. Sharp angles create stress points within the porcelain and the underlying metal framework, which can lead to fractures over time. It’s also critical to maintain a consistent reduction across the entire tooth. Uneven cuts or inconsistent depth can prevent the crown from seating properly, creating an unstable fit. The margins must be clear and continuous; an improper margin can cause gingival irritation or result in an unsightly dark line at the gumline. A precise and well-defined preparation allows your lab partner to fabricate a crown and bridge restoration that fits perfectly and looks completely natural.
How to Prep an Anterior Tooth for a PFM Crown
- To satisfy aesthetic needs, the reduction on the labial surface of an anterior tooth should be between 1.2mm-1.5mm while the lingual surface should be reduced by 1mm, and incisal surfaces.
- A central cervical groove that is parallel to the placement path along the long axis of the tooth must be created in order to properly prepare the labial surface, while other two secondary grooves should be placed on either side.
- There must be 1.8 mm of depth in the incisal edge reduction grooves that are installed.
- Then the reduction of 0.55mm is done on the lingual chamfer.
- The cervical shoulder between the depth grooves should be 1mm wide.
- Shape the lingual surface using a football-shaped diamond bur.
- A fine-grit diamond bur is then used to finish the preparation. If at all feasible, think about using metal collars since this will assist limit how much of the cervical teeth must be prepared. For teeth with exposed root dental pulp or gum disease, this is extremely advantageous.
Specific Preparation Dimensions and Angles
Achieving the right balance between tooth preservation and adequate space for restorative materials is the core challenge of any crown prep. For PFM crowns, this is especially true because you need to accommodate both the metal substructure and the porcelain overlay. Precision is non-negotiable. Specific angles and reduction depths ensure the final restoration is not only strong and durable but also aesthetically pleasing. Getting these dimensions right from the start prevents issues with fit, function, and the long-term health of the tooth, setting the stage for a successful outcome.
Anterior Taper Angle and Lingual Wall Height
For an anterior PFM crown, the preparation must create enough room for both materials without compromising the tooth’s integrity. This typically means a facial shoulder reduction of 1.2–1.5 mm to allow for sufficient porcelain thickness, which is key for a natural appearance. On the lingual side, a 0.5–1 mm chamfer is sufficient. The occlusal or incisal reduction should be between 1.5–2 mm. It’s also vital to round all internal line angles. Sharp angles create stress points within the porcelain, making the final restoration more susceptible to fractures over time.
Incisal Reduction and Finish Line Placement
The finish line is a critical component that dictates the final fit and marginal seal of the crown. For a PFM, the preparation will feature a distinct “shoulder” on the facial side and a “chamfer” on the lingual side. The shoulder provides a solid base to support the porcelain, preventing fractures and ensuring the best aesthetic result where it’s most visible. The lingual chamfer is more conservative, preserving tooth structure where aesthetics are less of a concern. Proper incisal reduction gives the lab technician enough space to build up porcelain that looks natural and can withstand biting forces, leading to a high-quality crown restoration.
Detailed Techniques for Anterior Preps
With the target dimensions in mind, the focus shifts to the specific techniques used to achieve them. A systematic approach using depth grooves and multi-plane reduction is the most reliable way to ensure you remove the right amount of tooth structure uniformly. This isn’t just about removing enamel; it’s about sculpting a foundation that will support the restoration for years to come. Each step, from facial reduction to defining the finish line, plays a crucial role in the final outcome.
Facial Reduction in Multiple Planes
The facial surface of an anterior tooth is not flat, so a single-plane reduction will result in uneven thickness and a poor aesthetic. To avoid this, you should reduce the facial surface in two distinct planes that follow the tooth’s natural contour. The cervical plane (the third of the tooth closest to the gumline) and the incisal plane (the remaining two-thirds) are prepared separately. This technique ensures a consistent 1.2–1.5 mm reduction across the entire facial surface, providing uniform space for the porcelain and preventing any accidental undercuts that could interfere with seating the crown.
Finish Line Definitions and Transitions
A clear, smooth, and continuous finish line is essential for a well-fitting crown. Start by creating a 0.5 mm chamfer on the lingual side and a 1.2-1.5 mm shoulder on the facial side. The facial shoulder should extend at least 1 mm past the interproximal contact area toward the lingual surface. This design provides robust support for the porcelain where it’s needed most. A well-defined margin is one of the most important details for the dental lab. When you send a digital scan, a crisp finish line allows technicians to fabricate a crown with a precise marginal fit, preventing leakage and promoting gingival health.
Interproximal Reduction Technique
Creating adequate space between the prepared tooth and its neighbors is crucial for proper contacts and contours in the final restoration. A great way to control this reduction is by using depth grooves. Start by making a central groove down the long axis of the tooth, followed by two more on either side. On the biting edge, create grooves about 1.8 mm deep. These grooves serve as a visual guide, helping you remove a consistent amount of tooth structure. When breaking contact with adjacent teeth, use a thin diamond bur to carefully slice through the interproximal area, avoiding damage to the neighboring teeth.
How to Prep a Posterior Tooth for a PFM Crown
- Depth holes are made in the occlusal area of posterior teeth to make it easier to make occlusal depth reductions while preparing them for PFM crowns.
- A lingual chamfer and a buccal collar can be made once these depth cuts are finished, which also allows for the reduction of the occlusion. At least 1mm lingually from the proximal connection should be covered by the buccal shoulder preparation.
- Typically, 1.5 to 2 mm of space is needed for the posterior teeth’s occlusal edges. If the crown is made with a metallic occlusal area or metal bite stop, the occlusal decrease may be minimal.
- It is essential that every margin be defined and continuous throughout the perimeter.
- The completed preparation must be free of any discernible bur marks and every other curve must be rounded.
- The incisal borders of anterior preparations and the change from the axial wall to the occlusal in posterior preparations are two places that are commonly overlooked during completion.
- Diamond burs or hand tools should be used to complete the margins.
If you need assistance coordinating PFM cases, material selection, or restorative planning, you can contact our dental lab for expert support and case guidance.
Key Considerations for All PFM Preps
Beyond the specific steps for anterior and posterior teeth, several universal principles guide a successful PFM preparation. Mastering these details ensures the final restoration is not only strong and beautiful but also promotes long-term oral health for your patient. Paying close attention to the material choice for the biting surface, the final texture of the prep, and the impact on surrounding gum tissue can make a significant difference in the outcome. These considerations are foundational to creating a crown that fits perfectly, withstands functional forces, and integrates seamlessly with the patient’s existing dentition, ultimately leading to fewer adjustments and higher patient satisfaction.
Metal vs. Ceramic Biting Surfaces
One of the first decisions in a PFM case is whether the biting surface will be metal or porcelain. This choice directly impacts your preparation design. PFM crowns with metal occlusal surfaces require less tooth reduction than those with ceramic surfaces. This is because metal is inherently strong and doesn’t need the same bulk for durability. A metal biting surface is an excellent option for patients with heavy bites or bruxism, as it is highly resistant to fracture and is generally gentler on the opposing teeth. Clearly communicating this choice to your lab partner ensures the restoration is fabricated to the correct specifications for a precise fit.
Achieving a Smooth Final Surface Texture
The final texture of your preparation is critical for the success of the restoration. After the bulk reduction is complete, the entire prep should be finished to be exceptionally smooth. The completed preparation must be free of any discernible bur marks, and all transitions and curves should be rounded. A smooth surface allows for a more accurate impression or digital scan, which translates to a better-fitting crown from the lab. It also helps distribute occlusal forces evenly across the tooth and crown, reducing the risk of stress concentrations that could lead to porcelain fracture or failure over time.
Managing Gum Health During Preparation
A well-executed crown preparation plays a vital role in maintaining periodontal health. The placement and design of your margins are key. A properly contoured margin that is smooth and continuous helps prevent plaque accumulation at the gumline, reducing the risk of gingivitis or other periodontal issues. Good preparation design helps keep the gums healthy and ensures the crown fits well against the tooth, creating a seal that protects the underlying tooth structure. This careful management of the tooth-gum interface is essential for the longevity of both the crown and the tooth it protects.
Considerations for Patients with Bruxism
When treating patients who grind or clench their teeth, material selection and preparation design are even more important. For patients with bruxism, you should strongly consider a PFM crown with a metal biting surface. The inherent strength and durability of the metal alloy can withstand the intense forces of bruxism far better than porcelain, which can be prone to chipping or fracturing under such stress. This functional design provides a long-lasting solution that protects the patient’s natural tooth and the restoration itself, ensuring they receive a crown that is built to last through demanding functional challenges.
PFM Crowns vs. All-Ceramic Crowns
When deciding between a PFM and an all-ceramic restoration, a primary clinical difference is the amount of tooth reduction required. A PFM crown prep is generally more aggressive, requiring about 1.5 to 2 mm of reduction. This is necessary to create adequate space for both the underlying metal framework and the overlying porcelain layer needed to mask the metal and achieve a natural look. In contrast, modern all-ceramic crowns, such as those made from zirconia, often require less reduction, typically in the range of 1 to 1.5 mm. This more conservative approach can help preserve more of the natural tooth structure. The choice between these crown and bridge solutions often depends on balancing the need for maximum strength, which PFM crowns traditionally offer, with the superior aesthetics and conservative preparation of all-ceramic options.
Modern Technology and Lab Communication
The success of any crown preparation doesn’t end when you put down the handpiece. The final outcome relies heavily on the technology you use to capture the prep and the quality of your communication with your dental lab. Embracing modern tools and fostering a strong, collaborative relationship with your lab technicians are essential steps. This partnership ensures that your clinical expertise is accurately translated into a final restoration that meets your standards and your patient’s needs, streamlining the entire process from impression to final seating.
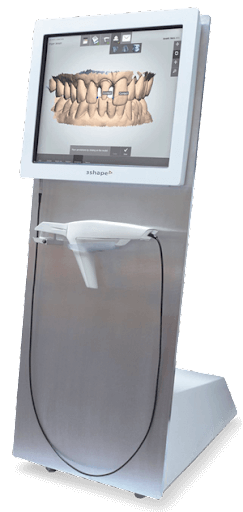
Integrating Digital Scanners into Your Workflow
Adopting a digital workflow with an intraoral scanner can significantly improve the accuracy and efficiency of your crown and bridge cases. Digital scanning is often faster and more comfortable for the patient compared to traditional PVS impressions. More importantly, it produces a highly accurate digital model of your preparation, leading to better-fitting crowns and reducing the likelihood of errors or remakes. By sending a digital file directly to the lab, you can shorten turnaround times and improve communication. At Next Dental Lab, we make it easy to connect your scanner and start sending digital cases, allowing you to take full advantage of a more precise and streamlined restorative process.
Communicating with Your Dental Lab
Clear and consistent communication with your dental laboratory is the cornerstone of a successful case. While preparation guidelines provide a solid framework, every patient is unique. You should always talk to your dental lab if a case is unusual or if a patient has specific aesthetic or functional needs, as the standard preparation rules might need to be adjusted. Providing detailed notes, photos, or digital scans with specific instructions on things like shade matching, margin design, or material choices helps the technicians craft a restoration that perfectly matches your vision. Think of your lab as an extension of your clinical team, dedicated to achieving the best possible outcome for your patients.
Frequently Asked Questions
How much tooth reduction is necessary for a PFM crown compared to an all-ceramic one? A PFM crown generally requires a bit more tooth reduction, typically around 1.5 to 2 mm. This is because you need to create enough space for both the metal substructure and the porcelain layer that covers it. In contrast, many modern all-ceramic crowns, like zirconia, can be done with a more conservative preparation of about 1 to 1.5 mm, which helps preserve more of the natural tooth.
What is the most common issue you see with PFM preps from dentists? One of the most frequent challenges is under-preparation. It’s understandable to want to preserve as much tooth structure as possible, but not creating enough space leaves the lab with a difficult choice. The result is often a crown that is too bulky and looks unnatural, or one with a porcelain layer so thin that it’s at risk of fracturing under normal function.
Are PFM crowns a good choice for patients with bruxism? Yes, they can be an excellent choice, especially if you design the crown with a metal biting surface. The metal alloy is incredibly durable and can withstand the heavy forces of grinding and clenching much better than porcelain alone. This approach gives your patient a strong, long-lasting restoration that is built to handle their specific functional demands.
Why is a two-plane facial reduction so important for anterior PFM preps? Anterior teeth have natural curves; they aren’t flat. If you reduce the facial surface in a single flat plane, you risk either removing too much tooth structure near the incisal edge or not removing enough near the gumline. A two-plane reduction follows the tooth’s natural contour, ensuring you create uniform space for the porcelain. This is the key to achieving a final crown that looks natural and not like a bulky cap.
Does my preparation technique need to change if I use a digital scanner? The fundamental principles of a good prep remain exactly the same. You still need smooth surfaces, rounded internal angles, and a very clear, continuous margin. However, a digital scanner is incredibly precise and will capture every single detail, including any imperfections. This means that a clean, well-defined preparation is even more critical for digital cases to ensure the lab can fabricate a perfectly fitting crown.
Key Takeaways
- Proper tooth reduction is a balancing act: Removing too little material can result in a bulky crown and gum irritation, while removing too much can weaken the tooth. Aim for smooth, rounded internal angles to prevent stress fractures and help your lab create a perfect fit.
- Tailor your prep to the tooth’s location: Anterior and posterior teeth have different needs. Anteriors require a specific two-plane facial reduction for a natural appearance, while posteriors need adequate occlusal clearance to withstand biting forces.
- Great restorations start with great communication: Your prep is only half the process. Sending a clear digital scan and providing detailed notes about patient needs, such as bruxism or specific aesthetic goals, allows your lab partner to fabricate a crown that meets your exact standards.